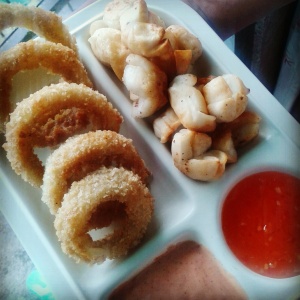
I am a person who is very fond of cooking. And of course, food. Recently, I have developed a taste for onion rings. Upon tracking my foodie adventures, this may just be an aftermath of eating food with onion rings as side dish. Yes, side dish. What do you expect? It’s quite rare for restaurants here in the Philippines to offer onion rings as a main dish. There are some but mostly, you’ll find these rings only as add-ons or as garnish to the main dish.
Onion rings are so underrated!
Onion Rings as Garnish
Lame, isn’t it? So this recent fondness with this food started in, obviously, it’s role as a garnish. But it tasted so good it really appealed to my taste buds that it became one of my adventures to hunt for them whenever we eat outside. Since my craving for onions rings became more and more intense, I planned to make my own. I reckoned it would be such a good idea since onion rings is quite pricey given it’s cheap raw ingredients, and not all restaurants I know offer good quality rings.
So I decided to really do it on my own. First, of course I did my research. I would never every try cooking something without consulting my parents or the internet. I don’t like wasting food. So I browsed the internet and found a good one from Panlasang Pinoy (http://panlasangpinoy.com/2011/02/26/onion-rings/). I even watched the youtube video.
Here are the ingredients:
1 large yellow onion, sliced
1 1/4 cups all-purpose flour
1 teaspoon baking powder
1 teaspoon salt
1 piece egg, beaten
1 cup milk
1 cup bread crumbs
1 teaspoon salt
1/4 teaspoon ground black pepper
3 cups cooking oil
But I forgot to buy milk when I was in the grocery. However, it was alright. My first onion rings was a success.

Here’s my procedure:
1. Slice onion cross-wise to make rings.
2. Soak them in room-temperature water.
3. In a bowl, mix the flour, baking powder, garlic powder, salt, and pepper.
4. Get the onion rings and dredge them in the powder mixture, then set aside.
5. After all onion rings are dredged, add egg and water to the powder mixture to create the batter.
6. Mix thoroughly.
7. Dip the onion rings into the batter.
8. Cover them with breadcrumbs.
9. Heat the pan and fry until golden brown.
The Dip
For the dip, I used Jufran sweet chili sauce, mayonnaise, mustard, ground black pepper, and hot sauce. Just mix them very well. You may also add a, little bit of vinegar for a sourer taste.
Adding Milk
But my Onions Rings journey does not end there. In fact I have made some modifications with the ingredients trying to make it better. For my second act, I tried to incorporate milk – the ingredient I forgot in the first. I used evaporated milk and the result was not very favorable. The breading was more fragile; it came off more easily than without milk in the batter.
![IMG_8pk1in[1]](https://eyedyllic.files.wordpress.com/2015/11/img_8pk1in1.jpg?w=279&h=300)
Two Eggs
I also tried using 2 eggs. The result: the batter was slipping off from the onions. It was too smooth that it was really hard to have the breadcrumbs stick with it.
![IMG_20151031_104434[1]](https://eyedyllic.files.wordpress.com/2015/11/img_20151031_1044341.jpg?w=300&h=300)
Using Cornstarch
Using cornstarch instead of flour would make the breading crispier and harder. But it’s not actually that good simply because it’s crispy. I wasn’t able to appreciate much the onions inside the hard covering. The breading must be crispy but not hard.
The Best Method
Based from my experience, the best method I have tried so far is to not add milk, to use just one egg, and use half cornstarch and half flour. That made the breading crispy but soft on the inside, and I was able to savor the onion inside!
Side Notes:
1. Additionally, do not put too much salt. It’s actually better if the breading is somewhat bland so you’d taste the onion more. And let the dip do the trick.
2. For the oil, use Canola oil. You see, the breading absorbs much oil and using a healthy oil would lessen the guilt.
![IMG_20151103_200503[1]](https://eyedyllic.files.wordpress.com/2015/11/img_20151103_2005031.jpg?w=300&h=300)